
Cool Kit – Episode 3
Here's the third in our series on cool paddling kit: a handy juice bag cleaning kit; a new compact set of pencil flares; a dry-bag for those paddlers planning on Molokai and a modification to the Epic leg leash.
Hydration Bladder Cleaning Kit
One thing you DON'T want to do is leave your juice bladders lying around damp in a hot climate. I did exactly that in Hawaii last year - and half an hour before we were due to fly across to Molokai, I discovered that my juice bladders were coated on the inside with a layer of black slime... Oh boy!
I scrubbed them out and rinsed them as best I could with a tooth brush and hot soapy water - but if I'd had this month's first piece of cool kit, I'd not have been in such a bad situation. The e3Gear 4 in One Hydration Bladder Cleaning Kit is a brilliant piece of kit.
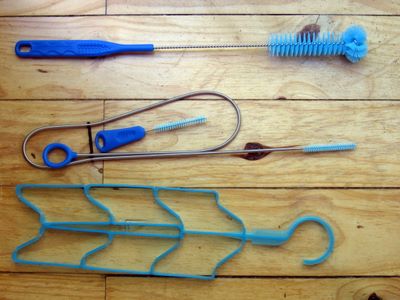
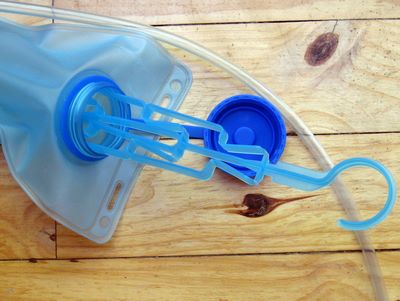
It comprises a large nylon brush for your hydration bag; a small brush for the mouth piece; a long flexible brush for the pipe and a dryer frame to hold the bag open so that it dries properly.
Where can you get it? Here in Cape Town, the Mocke's Paddling Centre has them. (The website, http://www.e3gear.com/ is under construction.) Elsewhere? Check with cycling and outdoor shops.
But for those travelling to Hawaii in May for this year's Molokai - don't forget this vital piece of cool kit - sucking slime is not a recommended practice.
Compact Flare Kit
Having been involved in two sea rescues, and having taken part in a sea rescue exercise with the South African National Sea Rescue Institute, I'm a firm believer in carrying flares when paddling offshore. Pencil flares ARE effective - I can personally vouch for this!
But the flares available in South Africa have tended to come in one of two packs - a waterproof but fairly bulky 6-pack or a leaky flat pack. The waterproof package is no longer available.
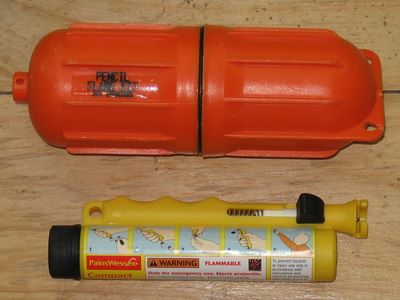
So when the agent sent me a set of Pains Wessex pencil flares I was delighted to discover that it's:
-
Much less bulky than the old set
-
Possible to operate them with one hand
Things to note about pencil flares
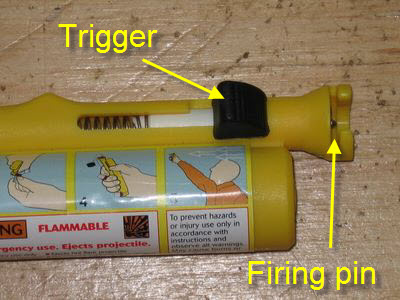
Open the package and practice using them before you get on the water. They're simple to use, but you don't want to be reading the instructions when you're in the water with 4m waves crashing on your head!
Always shoot them straight up in the air - don't shoot them upwind - you might "get your own back" and burning magnesium can spoil your whole day if you get in the face.
Always keep a flare for when you can SEE your rescuers - you'll see them long before they see you. You need a means of attracting their attention even when they're close by.
Don't fly with flares - the airlines tend to get a little antsy about this. There's a well known Cape Town paddler who earned a hefty fine when some customs officials found flares in his hand luggage!
Where can you get them? Again, here in Cape Town there are several outlets including the Mocke's Paddling Centre in Fish Hoek and http://www.paddlers.co.za/ in Simonstown.
(Pains Wessex manufacturer several other types of flare too - including a compact smoke flare - take your pick... but take a flare with you if you're going offshore!)
For more info see: www.pwss.com
Dry Bag
{mosimage}
I was properly prepared at Molokai in one department though. I'd been warned that you have to swim your overnight clothes and other gear out to your escort boat before the race. "Get yourself a decent dry bag," I was warned. "Don't do the black bin bag thing - they rip!"
I bought myself a 40litre SealLine Baja Bag at Go Bananas Watersports in Oahu a few days before the race. This is one of the larger models and I was able to fit my camera bag; laptop and clothes into it with ease.
The way it works is: you roll the top down the top edge and fasten it with a clip. This forms an airtight seal and keeps your kit completely dry. (I also duct-taped the clip so that it wouldn't come undone during the shenanigans in the short break when I was trying to catch a lift on the handy jetskis that were helping people out to the escort boats.)
{mosimage}
{mosimage}
{mosimage}
There are a number of different manufacturers - but I can strongly recommend the SealLine bags. They come in different sizes, they're tough and they work really well. www.seallinegear.com
(Huki make a really cool-looking bag too - in backpack form. That could really work well at Molokai when you have paddle your bag out to the escort boat. See www.huki.com).
Leg Leash Quick Release Modification
{mosimage}
I'm a STRONG believer in using leg leashes when offshore - especially in strong winds. I'm an equally strong believer in undoing your leg leash before coming in through the surf!
On my leash, the clip that attaches the coiled part to the padded Velcro part that goes around your calf was a mini-karabiner. This was sometimes a bitch to undo and I replaced it with a quick-release snap-shackle. (I broke the D-ring on the velcro bit too when I came off in waves recently. I replaced it with a stainless steel ring.)
I bought the shackle at a yachting store - they're a standard piece of equipment on rigging...
With the aid of some whipping twine (available from any good rope shop) I whipped the end of the plastic coil onto the shackle. It doesn't look incredibly smart, but it's strong. I also made a small rope handle on the release side of the shackle.
Now it's extremely easy to undo my leg leash - reach down, grab the red handle, one jerk and the leash is off.
{mosimage}
There are several manufacturers that sell leg leashes - mine is an Epic leash; Huki make a similar model. Get them from: